Hey guys, I know it’s been a while, but I’ve been quite busy with classes (well, one) and my myriad projects. Anyways, I went all-out for my first Thanksgiving on my own.
Cranberry sauce:
1 12 oz bag of cranberries
1 cup white sugar
1 cup orange juice
Dissolve sugar in orange juice on medium heat, add cranberries, cook until they explode.
Potato Salad:
5 lbs of peeled white potatoes, sliced and pressure cooked 5 minutes at 80 kPa
mayonnaise, not that Miracle Whip rubbish
dried dill
chopped green onions
6 hard-cooked eggs (not boiled)
Sausage/apple stuffing:
toasted stale bread cubes
pork sausage
diced Spanish onion
sliced celery
mint leaves
whole rosemary
powdered sage
olive oil
chicken broth
chopped apple
The best gravy I’ve ever made:
turkey drippings (frozen to skim fat)
red wine
powdered sage
whole rosemary
corn starch
Roasted carrots/green beans:
Wrapped in foil with orange juice and olive oil
Homemade toffee
Storebought apple pie
A chilled French rosé
Delicious, but I'm guessing I'll be eating it over and over for the next two weeks :P . Next time, I'll just go home, I think.
The pointless ramblings of a young PhD student, out on his own in a huge city for the first time. Computers, electronics, photography, cooking, and whatever else pops into mind.
Saturday, October 8, 2011
Tuesday, July 19, 2011
Step-by-step XBMC ZBOX setup
Here are the step-by-step instructions for configuring the ZBOX HD-ID41 as a media PC running XBMC. There’s still a few issues, like outputting encoded audio over HDMI. I’ll have to do some more experimenting when I have the chance, but I do have a full-functional machine after following these steps:
- Get Ubuntu 11.04 ‘Natty Narwhal’
- Go to http://www.ubuntu.com/download/ubuntu/download to download the 64-bit desktop edition, and follow the instructions for transferring it to a USB flash drive. (Or CD, if you have an external CD drive)
- Install Ubuntu
- Insert the USB drive into one of the USB 2.0 ports (drives don’t seem to boot properly from 3.0 ports)
- Boot the ZBOX, tapping the F11 button until the boot device menu appears
- Boot from the flash drive and choose Install Ubuntu from the menu
- Follow the prompts, selecting the ‘Download updates while installing’ and ‘Install this third-party software’ options
- When asked to Allocate drive space, choose one of the automatic partitioning options (or if you know what you’re doing you can partition manually)
- Continue through the installer, filling out the requested information
- For the greatest convenience, set auto-login for your user. However, unless you use a blank password, Ubuntu will ask for the password if access to the keychain is required.
- Restart
- Disable Unity (optional)
- If Unity, Ubuntu’s new UI bothers you (as it does, me), it can be disabled by going to the Login Screen page in System Settings.
- Select “Ubuntu Classic” as default session
- Logout and back in
- Install and Configure Video
- To get proper video playback, you need to install the proprietary NVIDIA display drivers, vdpau, and the configuration tool for compiz
- In a terminal window, type:
- sudo apt-get install nvidia-common libvdpau1 vdpau-va-driver compizconfig-settings-manager
- Ubuntu will ask for your password then ask you to confirm the installation
- sudo apt-get install nvidia-common libvdpau1 vdpau-va-driver compizconfig-settings-manager
- Restart to activate the driver
- In a terminal window, type:
- A few tweeks are needed to prevent tearing artifacts in video playback:
- Open System > Preferences > CompizConfig Settings Manager
- Click Composite
- Disable ‘Detect Refresh Rate’
- Set ‘Refresh Rate’ to the refresh rate of your display. (Probably 60 Hz, but you can check in the NVIDIA X Server Settings
- Enable ‘Unredirect Fullscreen Windows’
- To get proper video playback, you need to install the proprietary NVIDIA display drivers, vdpau, and the configuration tool for compiz
- Audio
- Open System > Preferences > Sound
- Click the Hardware tab
- For HDMI sound:
- Click High Definition Audio Controller
- Set Profile to ‘Digital Surround 5.1 (HDMI) nr 2 Output
- For Optical out:
- Click Internal Audio
- Set Profile to ‘Digital Stereo (IEC958) Output + Analog Stereo Input
- Click Test Speakers
- If no sound is output, type alsamixer in a Terminal window, and unmute either the S/PDIF outputs or IEC958 outputs with the ‘m’ key
- Set output parameters
- Type sudo gedit /etc/pulse/daemon.conf in a Terminal
- To set the output sample rate, add the line:
- default-sample-rate = x
- Where x is the sample frequency in Hz (default 44100)
- default-sample-rate = x
- To set the output bit depth, add the line:
- default-sample-format = 2xle
- Where x is the bit depth in bits (default 16)
- default-sample-format = 2xle
- These changes will not be made until you restart pulseaudio or the computer:
- pulseaudio -k
- pulseaudio --start
- If there is still no sound with HDMI output, you may need to add the following line to your /etc/pulse/default.pa file:
- load-module module-alsa-sink device=hw:1,7
- XBMC
- As there is not yet a stable repository for Ubuntu Natty, we will use the one for Maverick
- Type the following into a terminal window:
- sudo add-apt-repository ppa:team-xbmc
- Open System > Administration > Synaptic Package Manager
- Settings > Repositories
- Click the ‘Other Software’ tab
- Edit the two lines from team-xbmc, changing the distribution from Natty to Maverick
- Close Synaptic
- In a Terminal, type:
- sudo apt-get update
- sudo apt-get install xbmc
- XBMC will then be installed, and can be found in Applications > Sound & Video
- In XBMC, go to System > System > Audio Output
- For HDMI out, set Audio Output to analog, Speaker configuration to match your speakers, and set Audio output device to ‘High Definition Audio Controller Digital Surround 5.1 (HDMI) nr 2”
- For Optical out, set Audio Output to Optical/coax, Audio output device to ‘Internal Audio Digital Stereo (IEC958), and Passthrough output device to ‘HDA Intel iec958’. The other settings should be set depending on your speaker setup.
- Go to System > Video > Playback
- Enable VDPAU and ‘Adjust display refresh rate to match video’
Sunday, July 17, 2011
Pak Tong Koh
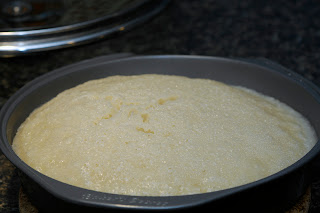
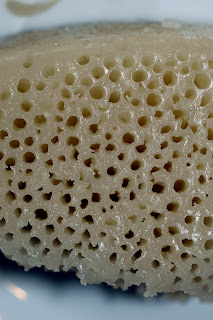
Pak Tong Koh is a leavened, steamed, Chinese cake. It’s very light and features a distinctive porous structure. It’s one of the sweeter Chinese dishes I know of, but is tempered with a noticeable tang from the yeast. I don’t have a proper steamer, but I perched a cake pan on top of a vegetable steamer in a large pot and it seemed to work quite well. My grandmother used to make this all the time, sometimes with brown sugar, sometimes with yellow rock sugar and I’ve been trying to figure it out for years. I’m probably biased, but I think I’ve finally got her’s beat. I’ll have to make it next time I’m home and see. The recipe is a modification/combination of these two recipes: http://chowtimes.com/2007/01/17/steamed-rice-cakes-pak-thong-koh/ and http://wlteef.blogspot.com/2005/06/white-sugar-sponge.html It’s closest to the second recipe, but with the sugar syrup idea from the first. I’ve switched to normal dry yeast and have managed to greatly reduce the preparation time. Apart from the steaming setup, it requires no specialized utensils or tools and is very easy to make. Enjoy!
Serving Size: 12
Yield: 1 cake
Ingredients:
A
190 g rice flour
120 mL water
B
50 mL warm water
8 g dry yeast
10 g white sugar
C
250 mL water
150 g golden sugar
Directions:
1. Mix B and set aside.
2. Mix A together to make a thickened paste.
3. Dissolve sugar in boiling water from C
4. Pour C into A, while still hot, mixing together until smooth. Whisk for 5 min. Put the bowl into the freezer. Wait until cooled to approximately 40 °C. (If it is too hot, the yeast will die)
5. Stir B into the mixture. Cover bowl with a damp towel and set in a warm place for 30 min. The mixture should be actively bubbling.
6. Pour the mixture into a 20 cm round cake pan, lightly oiled, and steam for 25 minutes.
7. Let cool before slicing.

Serving Size: 12
Yield: 1 cake
Ingredients:
A
190 g rice flour
120 mL water
B
50 mL warm water
8 g dry yeast
10 g white sugar
C
250 mL water
150 g golden sugar
Directions:
1. Mix B and set aside.
4. Pour C into A, while still hot, mixing together until smooth. Whisk for 5 min. Put the bowl into the freezer. Wait until cooled to approximately 40 °C. (If it is too hot, the yeast will die)
6. Pour the mixture into a 20 cm round cake pan, lightly oiled, and steam for 25 minutes.

Subscribe to:
Posts (Atom)


